SD Card won’t format? Here’s how to fix
SD cards are really handy when it comes to backup storage. It is pretty common for users to format their SD cards as they are often used for different purposes. However, in some cases, the formatting process may turn out to be troublesome and frustrating. As it turns out, your SD card may not format in some scenarios and the simple process of formatting which is supposed to be just a few clicks can become a problem. This can often happen with SD cards and there are quite a few reasons for this.
As it turns out, one of the reasons why this problem may occur is the write-only lock that is located on your SD card. Most SD cards these days have a lock on the side of it which prevents you from modifying and deleting the contents of the SD card. This happens when you have the lock enabled on your SD card which can be easily disabled by just moving the switch up. In other cases, if your SD card is corrupted, you will notice the SD Card not showing up in your Windows File Explorer. To understand the problem better and why you could be facing it, let us first go through the different reasons why this issue may occur, and then we will proceed with showing you various ways of solving it. So, let us get started.
- Write-Protection — As it turns out, in most cases your SD card will have a write-protection lock on the side of it. When this lock is enabled, users are not allowed to remove or even modify the contents of the SD card. In such a scenario, you will have to unlock the SD card via the switch. In case you do not have a lock switch, it is still possible that the card is write-protected through other means. You can remove the write protection through Windows utilities in such a case.
- Bad Sectors — Another reason you might be facing the issue in question here is due to bad sectors. In such a case, what you can do is completely clean the card and then repartition it using the DiskPart utility on Windows.
Now that we have mentioned the most probable causes of the problem that you are facing, let us jump into the different solutions that will help you in resolving it. So, without further ado, let us get right into it.
Remove Write Protection
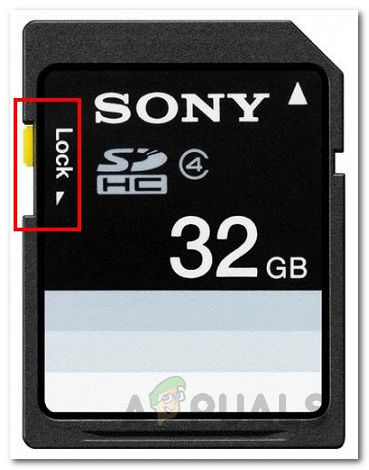
As it turns out, the first thing that you should do when you face the problem in question is to make sure your SD card is not write-protected. The write protection functionality is accompanied by a lock switch on most SD cards that is located on the side of the card. What this does is prevents users from modifying or removing the files and folders inside the SD card when enabled.
Therefore, go ahead and remove your card if you are using a card reader, and then on the side of the card, see if there’s a switch. You should see a lock written on the SD card. Make sure that the SD card is not locked from there. You can use the picture down below for reference.
In case you don’t see a lock switch on the side of the SD card, then, in such a scenario, you should use the DiskPart utility to remove write protection from your card. If you do not know much about DiskPart, you can give our DiskPart Manual a look. With that said, follow the instructions below to remove write protection using DiskPart:
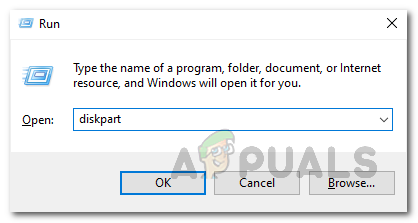
- First of all, open up the Run dialog box by pressing the Windows key + R combination.
- Then, in the Run dialog box, type in diskpart and then hit the Enter key. On the User Access Control prompt that appears, click Yes.
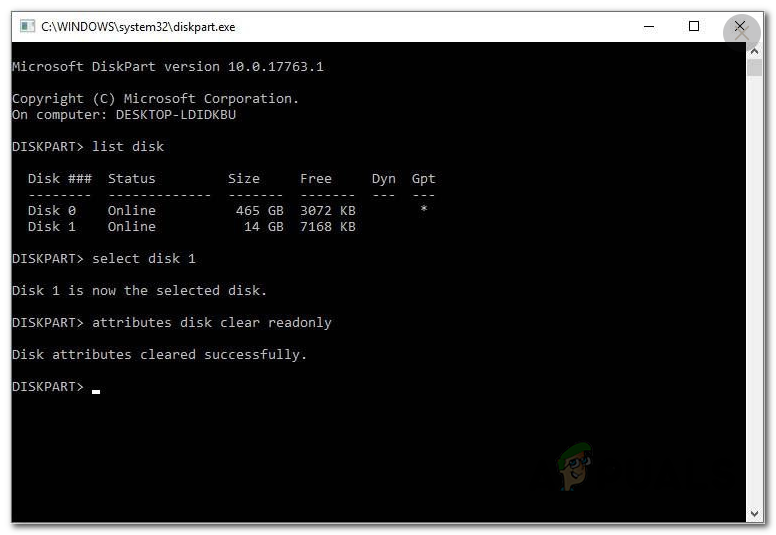
Opening DiskPart - This will open up the DiskPart utility in a command prompt window.
- Now, first of all, we will have to select your disk. To do this, type in list disk and then hit the Enter key.
- Then, from the list of disks, note the number of your SD card. You can use the size for reference.
- Once you have the number, type in select disk X and hit Enter. Here, X is the number of your disk.
- After you have selected your disk, type in attributes disk clear read-only and hit Enter.
Removing Write Protection using DiskPart - This will remove the write protection from your card.
- Once you have done that, go ahead and close the DiskPart window. After that, go ahead and try to format your SD card again to see if the issue persists.
Repartition your SD Card with DiskPart
As it happens, when you are not able to format your SD card, the problem could be related to bad sectors of the SD card. In such a scenario, you will have to repartition your disk using the DiskPart utility. This will enable us to thoroughly clean the SD card and then create new partitions on it. Such issues can usually arise when you use the SD card on multiple devices and it messes with the file system. With that said, follow the instructions to repartition your SD card:
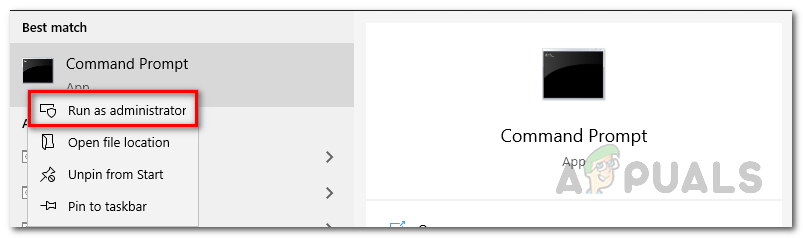
- First of all, you will have to open an elevated command prompt. To do this, search for cmd in the Start Menu and then right-click on it. Choose the Run as administrator option.
Open Command Prompt as an Admin - Once the command prompt window is open, type in diskpart and hit the Enter key.
- This will take you to the DiskPart prompt. Now, the first step would be to select your SD card.
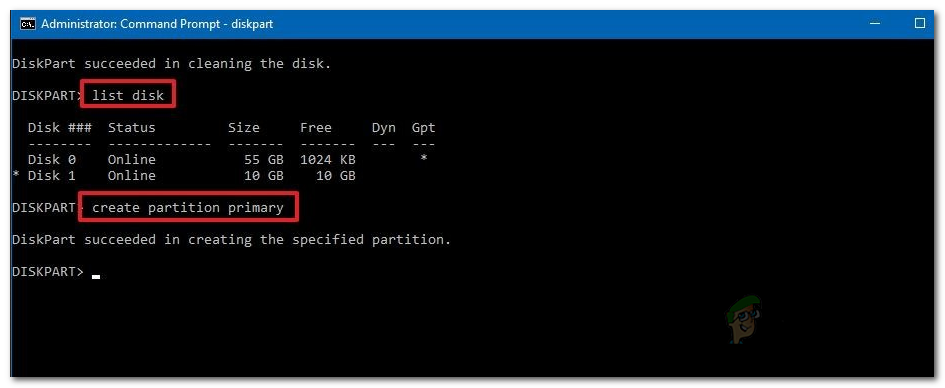
- To do that, type in list disk and hit Enter.
- Look for your SD card’s disk number and then type select disk X. Here, X is the number of your disk.
- Once you have done that, go ahead and enter clean in the prompt.
Cleaning the Disk - This will go ahead and clean the SD card. After that, we will have to create partitions on the disk.
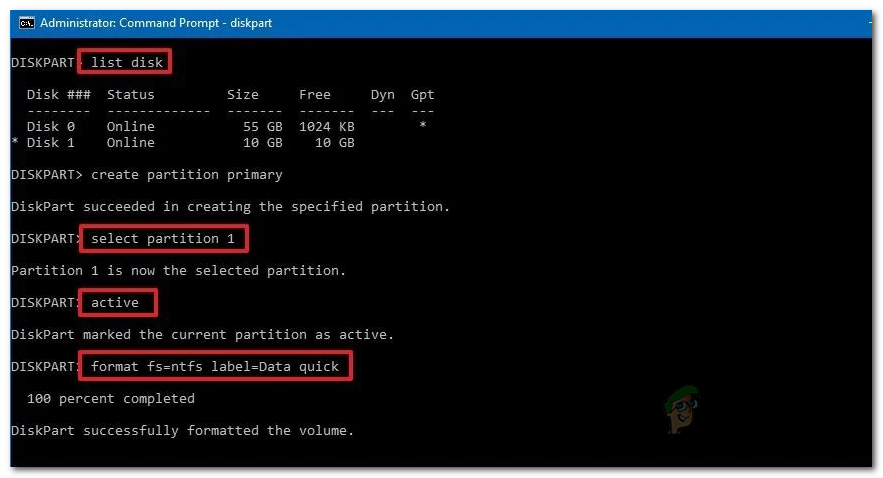
- To do this, type in create partition primary and hit Enter.
Creating a Primary Partition - Then, to select the partition we just created, type in select partition 1 and hit Enter.
- Now, we have to make this partition active. To do this, simply enter active in the prompt.
- Finally, we can format the SD card using DiskPart.
- To do that, type in “format fs=ntfs label=SDCard quick” without the quotes and then hit Enter.
Formatting the Disk using DiskPart - After that, to make it appear in the File Explorer, we will have to assign it a letter. To do this, simply type in “assign letter=g” without the quotes and then hit Enter. You can assign it any letter you wish.
- Once you have done all of that, you can close the command prompt window safely. Open up the File Explorer and see if the drive is available there.

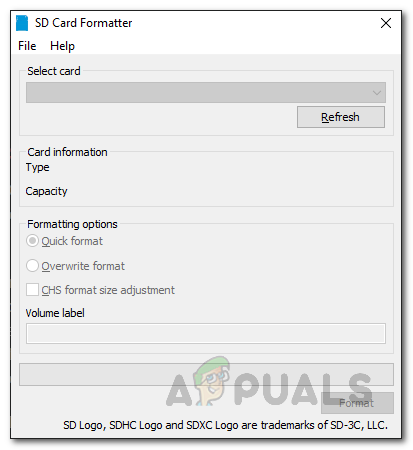
Use Third-Party Formatting Software
In case the above solutions do not work out for you, what you can do is use a third-party formatting software and see if that bears any fruits. More often than not, these formatters can actually format your SD card when you are facing issues with normal formatting methods. The third-party formatting software that we would recommend is the SD Memory Card Formatter that you can find by clicking here. Go ahead and download the formatting software from the link provided and once downloaded, extract the zip file. Then, make your way to the extracted folder and run the setup file. Once the setup has been completed, the SD Card Formatter tool should open up. You can then use it to format your SD card to see if it works.